Battery switch on travel trailer function is crucial for managing your RV’s power. Understanding how your battery switch works is key to preventing dead batteries and ensuring your appliances function correctly. This guide breaks down the different types of switches, their functions, troubleshooting tips, and maintenance best practices. We’ll cover everything from basic operation to advanced wiring diagrams, empowering you to become your own RV electrical expert.
This guide covers various battery switch types found in travel trailers, their advantages and disadvantages, wiring diagrams, and troubleshooting common issues. We’ll also explore how the battery switch impacts different trailer systems and delve into maintenance and replacement procedures. Think of it as your complete handbook for mastering your travel trailer’s electrical system.
Battery Switch Types in Travel Trailers: Battery Switch On Travel Trailer Function
Choosing the right battery switch for your travel trailer is crucial for managing your power system effectively and safely. Different types offer varying levels of control and protection, impacting both convenience and the longevity of your batteries. Understanding these differences will help you select the best option for your needs.
Single-Pole Battery Switches
A single-pole switch is the simplest type. It allows you to connect or disconnect one battery at a time. This is typically used in setups with only one battery, or where a single battery is used to power the trailer’s 12V system. Wiring is straightforward; the switch acts as a simple on/off for the battery’s positive lead. The negative lead typically remains permanently connected.
Okay, so you’re dealing with your travel trailer’s power, right? Knowing how to use the battery switch is key. Check out this helpful guide on the battery switch on travel trailer function to understand the basics. It’s super important to know how to properly switch between your house batteries and your tow vehicle’s battery. This is especially true if you’re off-grid for a while, and need to conserve power.
Another great resource, especially for those tricky situations, is this article about the battery switch on travel trailer function – it covers some troubleshooting tips too! Mastering this will keep your lights on and your fridge cold!
Advantages and Disadvantages of Single-Pole Switches
Single-pole switches are inexpensive and easy to install. However, they lack the flexibility of more advanced types. They don’t allow for combining batteries or isolating them completely for maintenance.
Wiring Diagram for a Single-Pole Switch, Battery switch on travel trailer function
Imagine a simple circuit. The positive (+) terminal of the battery is connected to one side of the switch. The other side of the switch is connected to the positive (+) bus bar or power distribution center of the trailer. The negative (-) terminal of the battery is directly connected to the trailer’s chassis or negative bus bar. The switch simply breaks or makes the positive connection.
Double-Pole Battery Switches
A double-pole switch controls both the positive and negative leads of a single battery. This offers better safety as both connections are broken when the switch is off, reducing the risk of accidental short circuits during maintenance. It provides a complete disconnect.
Advantages and Disadvantages of Double-Pole Switches
Double-pole switches improve safety compared to single-pole switches. They provide a complete battery disconnect, making maintenance safer. However, they are slightly more expensive and slightly more complex to install than single-pole switches. They still only control one battery at a time.
Wiring Diagram for a Double-Pole Switch
In this setup, both the positive and negative leads from the battery connect to the switch. The switch simultaneously breaks both connections when turned off. The output sides of the switch then connect to the positive and negative bus bars in the trailer.
Double-Pole Double-Throw (DPDT) Battery Switches
DPDT switches are the most versatile option. They allow you to connect either one battery or two batteries in parallel to power your trailer, offering greater flexibility in managing your power sources. They typically have three positions: “Off,” “Battery 1,” and “Battery 1 & 2.”
Advantages and Disadvantages of DPDT Switches
DPDT switches offer the greatest flexibility, allowing for the use of two batteries and extending your runtime. However, they are the most complex to install and are also the most expensive.
Wiring Diagram for a DPDT Switch
A DPDT switch has multiple contact points. The positive and negative leads of each battery connect to the switch. The switch configuration allows for selecting either battery 1, battery 2, or both in parallel, connecting them to the trailer’s power system. A detailed diagram would show multiple paths depending on the switch position.
Comparison of Battery Switch Types
| Feature | Single-Pole | Double-Pole | Double-Pole Double-Throw (DPDT) |
|---|---|---|---|
| Number of Batteries Controlled | One | One | Two (or one) |
| Safety | Lower | Medium | Medium-High |
| Complexity | Low | Medium | High |
| Cost | Low | Medium | High |
| Typical Application | Single battery systems | Single battery systems requiring complete disconnect | Dual battery systems |
Function and Purpose of the Battery Switch
The battery switch in your travel trailer is a crucial component of its electrical system, acting as a central control for managing power flow between your various batteries. It allows you to isolate or connect different battery banks, preventing unwanted drain and maximizing battery life. Understanding its function is key to maintaining your trailer’s power supply and avoiding costly repairs.The primary function of the battery switch is to selectively connect or disconnect your house batteries (used for interior lights, appliances, and other 12V systems) from the chassis battery (used to power the vehicle’s essential functions like starting the engine).
This prevents the house batteries from draining the chassis battery, which could leave you stranded. Conversely, it also prevents a dead house battery from draining the chassis battery. The switch typically offers multiple positions, allowing you to connect both battery banks, connect only the house batteries, connect only the chassis battery, or disconnect both completely.
Battery Switch Operation: Preventing Battery Drain
Properly using your battery switch is vital for preventing premature battery drain. Here’s a step-by-step guide:
1. Before disconnecting from shore power
Always turn off all appliances and electronics in your travel trailer. This ensures no unnecessary current is being drawn from your batteries.
2. Selecting the appropriate switch position
When you’re parked and not connected to shore power, switch to the “Off” or “Both Batteries Disconnected” position to completely isolate the batteries. This prevents parasitic drain from electronics and prevents a dead battery from draining the other.
3. Connecting to shore power
When connected to shore power, switch to the “Both Batteries Connected” position. This allows the charger to replenish both the house and chassis batteries.
4. Driving
While driving, ensure the switch is in the “Both Batteries Connected” position (or a similar position depending on your switch’s configuration) to allow the alternator to charge both battery banks.
5. Regular checks
Periodically check the switch position to ensure it’s in the correct setting for your current situation.
Okay, so you’re prepping for your awesome travel trailer adventure, right? First things first: understanding your battery system. Check out this super helpful guide on the battery switch on travel trailer function to make sure you’re not stuck in the dark. Seriously, knowing how to use that switch is key for keeping your lights and appliances running.
Then, for extra info and maybe some different perspectives, this other resource on the battery switch on travel trailer function might be useful. Knowing your battery setup is half the battle to a smooth trip!
Battery Switch Maintenance
Regular maintenance ensures your battery switch operates reliably. This involves periodic visual inspections for corrosion on the terminals and connections. Clean any corrosion with a wire brush and apply a corrosion inhibitor to prevent future build-up. If you notice any signs of damage or loose connections, address them promptly to avoid electrical issues. Regularly tightening the connections will help maintain a good electrical contact, improving the overall performance and lifespan of your battery switch.
Ignoring maintenance can lead to poor charging, reduced battery life, and even fire hazards. It’s a small task that can prevent significant problems.
Wiring and Installation of Battery Switches
Installing a battery switch in your travel trailer is a relatively straightforward process, but safety and proper wiring are crucial to prevent damage to your equipment and avoid potential hazards. This section details the steps involved, offering guidance on safe practices and ensuring a long-lasting, reliable system.
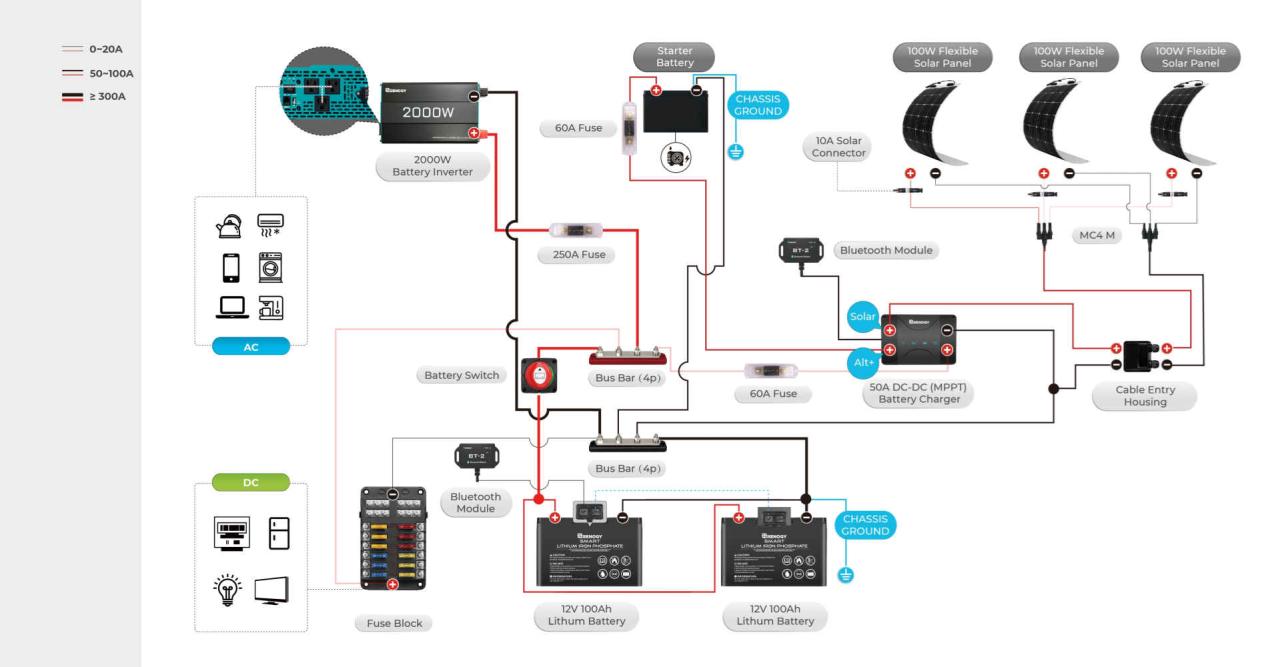
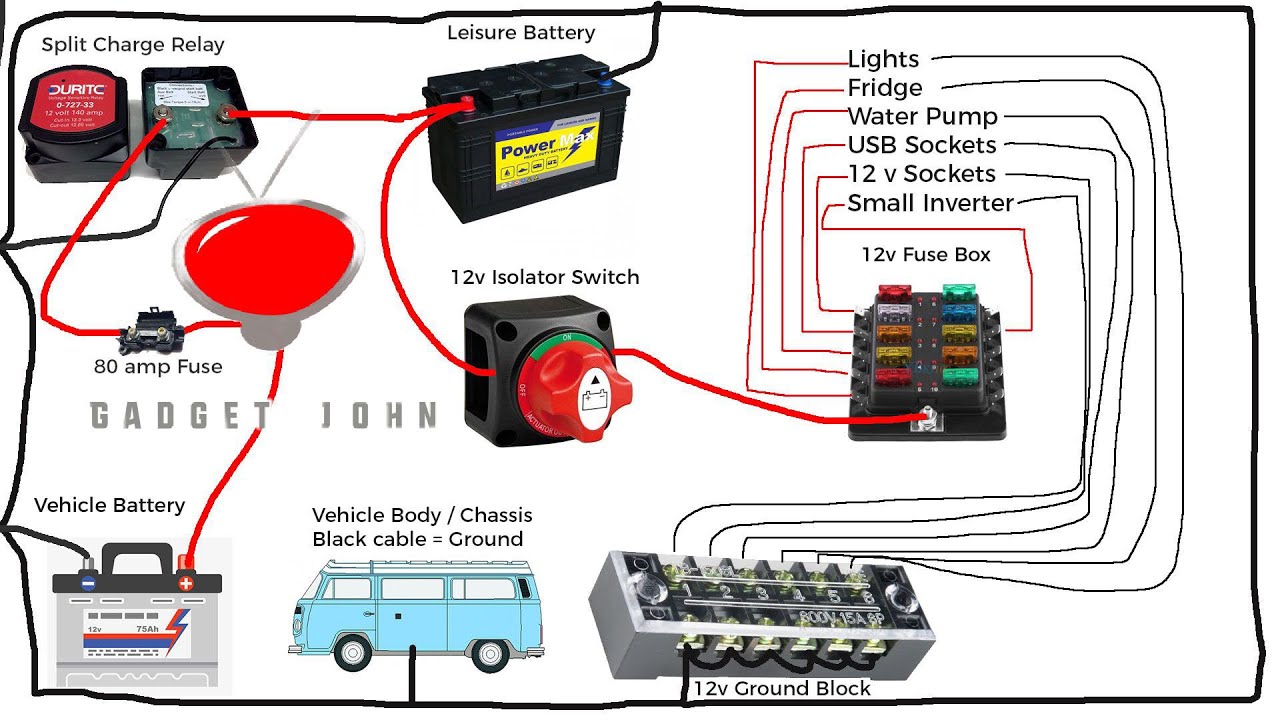
Simple Wiring Diagram for a Typical Travel Trailer Battery System
A typical setup involves a single battery connected to the switch, which then feeds power to the trailer’s 12V system. The following describes a simple diagram: Imagine a battery (represented by a + and – terminal), connected via heavy-gauge wire to the input terminals of a battery switch. The switch itself has two output terminals. One output terminal connects to the positive (+) side of your trailer’s 12V system via another length of heavy-gauge wire, while the other output terminal is connected to the negative (-) side of your trailer’s 12V system, also with heavy-gauge wire.
The negative cable connected to the battery should also be connected to the trailer chassis for grounding. This creates a complete circuit that can be easily switched on and off. Remember to use appropriately sized wire for the amperage draw of your system – consult an electrician if unsure.
Battery Switch Installation Procedure
Before starting, disconnect the negative (-) terminal from your battery to prevent accidental short circuits. Choose a location for the switch that’s easily accessible but protected from the elements. Securely mount the switch using appropriate fasteners. Carefully strip the ends of your battery cables, ensuring a clean cut to avoid fraying. Crimp on appropriately sized ring terminals to the ends of the wires.
Connect the positive (+) and negative (-) battery cables to their corresponding terminals on the switch, tightening the connections firmly. Then, connect the output terminals of the switch to the positive and negative bus bars or distribution points in your trailer’s 12V system. Finally, reconnect the negative (-) battery terminal. Test the switch to ensure it operates correctly, turning the power on and off and checking your trailer’s systems.
Preventing Corrosion and Ensuring Secure Connections
Corrosion is a common enemy of electrical connections. To prevent it, apply a dielectric grease to all wire connections before tightening them. This grease prevents moisture from reaching the metal, inhibiting corrosion. Use high-quality ring terminals and ensure a tight connection; loose connections generate heat, which accelerates corrosion. Always use appropriately sized wire and terminals for the amperage draw of your system.
Consider using corrosion inhibitors on your battery terminals and cables as an extra preventative measure.
Connecting Battery Cables to a Battery Switch
The correct procedure involves using appropriately sized ring terminals. These terminals should be crimped onto the ends of your battery cables using a proper crimping tool, ensuring a secure and reliable connection. The positive (+) cable from the battery should be connected to the “in” terminal of the switch, clearly marked with a “+” symbol. The positive (+) cable to your trailer’s 12V system should be connected to the “out” terminal marked “+”.
The negative (-) cables follow the same pattern, with the battery’s negative cable connecting to the switch’s “in” terminal, and the trailer’s negative cable to the “out” terminal. Ensure all connections are tight to prevent overheating and potential fire hazards. Remember to always disconnect the negative terminal first before working on any electrical components.
Battery Switch Maintenance and Replacement
Keeping your travel trailer’s battery switch in good working order is crucial for reliable power. Regular maintenance prevents problems and extends the lifespan of the switch, saving you from costly repairs or inconvenient breakdowns on the road. Neglecting maintenance can lead to corrosion, malfunction, and even potential fire hazards.Regular maintenance involves a simple inspection and cleaning process. Replacing a faulty switch is a straightforward task, but proper safety precautions are essential to avoid electrical shocks or damage to your trailer’s electrical system.
Choosing a compatible replacement is key to ensuring seamless operation.
Regular Maintenance Schedule
A visual inspection of the battery switch should be part of your pre-trip checklist and should be performed at least every three months, or more frequently if your trailer is exposed to harsh weather conditions. Look for signs of corrosion on the terminals, loose connections, or any physical damage to the switch itself. Clean the terminals with a wire brush and baking soda solution to remove any corrosion buildup.
Tighten any loose connections. Lubricate moving parts with a dielectric grease to prevent corrosion and ensure smooth operation. If you notice any unusual wear or damage, it’s best to replace the switch rather than risk a failure.
Replacing a Faulty Battery Switch
Before starting any work on your electrical system, always disconnect the negative battery cable. This is a crucial safety step to prevent accidental shocks. Once the negative cable is disconnected, carefully remove the old switch. Note the wiring configuration before disconnecting any wires; taking pictures is helpful. When installing the new switch, ensure it is securely mounted and the wiring is correctly connected, matching the configuration of the old switch.
After installing the new switch, reconnect the negative battery cable and then test the switch to ensure it’s functioning correctly.
Selecting a Compatible Replacement Switch
Choosing the right replacement switch is vital for a safe and reliable system. The replacement switch should have the same amperage rating as the original switch. You can usually find this information printed on the old switch itself. The physical dimensions should also be compatible with the existing mounting location. Consider the type of switch (e.g., single pole, double pole, etc.) to ensure it matches your system’s requirements.
While replacing with an identical switch is the simplest option, you might consider upgrading to a switch with added features, such as a built-in voltmeter, if your budget allows. Always check the manufacturer’s specifications to ensure compatibility with your trailer’s electrical system.
Safely Disconnecting and Reconnecting the Battery System
Before disconnecting any wires, always disconnect the negative (-) battery cable first. This prevents accidental short circuits and protects you from electrical shocks. After disconnecting the negative cable, you can then safely disconnect the positive (+) cable. When reconnecting, reverse the process: connect the positive (+) cable first, then the negative (-) cable last. This ensures a safe and controlled reconnection process.
Use appropriate tools for disconnecting and connecting the cables, such as insulated pliers or wrenches, to avoid damaging the cables or receiving a shock. After reconnecting, test the system to ensure proper operation before hitting the road.
Mastering your travel trailer’s battery switch is key to a smooth and enjoyable RV experience. By understanding the different switch types, their functions, and troubleshooting techniques, you can confidently manage your power and prevent frustrating breakdowns. Regular maintenance and a little know-how will keep your batteries charged and your adventures rolling!
Answers to Common Questions
What happens if I leave my battery switch on all the time?
Leaving your battery switch on constantly can drain your house batteries, especially if you have parasitic draws (small electrical loads that continue even when the trailer is off). This can lead to a dead battery and prevent your trailer from functioning.
Can I install a battery switch myself?
While possible, installing a battery switch yourself requires some electrical knowledge and comfort working with 12V systems. If you’re unsure, it’s best to consult a professional RV technician to avoid damaging your trailer’s electrical system.
How often should I check my battery switch?
Regularly inspect your battery switch for corrosion, loose connections, and any signs of damage. A visual inspection every few months, especially before and after long trips, is recommended.
What size battery switch do I need?
The appropriate size depends on the amperage of your battery system. Check your trailer’s electrical system documentation or consult an RV technician to determine the correct amperage rating for your battery switch.
